Since every kid is an artist and they all love dinosaurs, why not do a fun dinosaur drawing tutorial? Bring Jurassic Park to life with our free printable complete with step-by-step instructions for teaching kids how to draw a dinosaur. Make it a fun Friday group activity or keep it on hand for your fast finishers.
There’s a video tutorial and images with step-by-step instructions. Plus, be sure to download the free printable instructions so kids can easily follow along.
How To Draw a Dinosaur Video
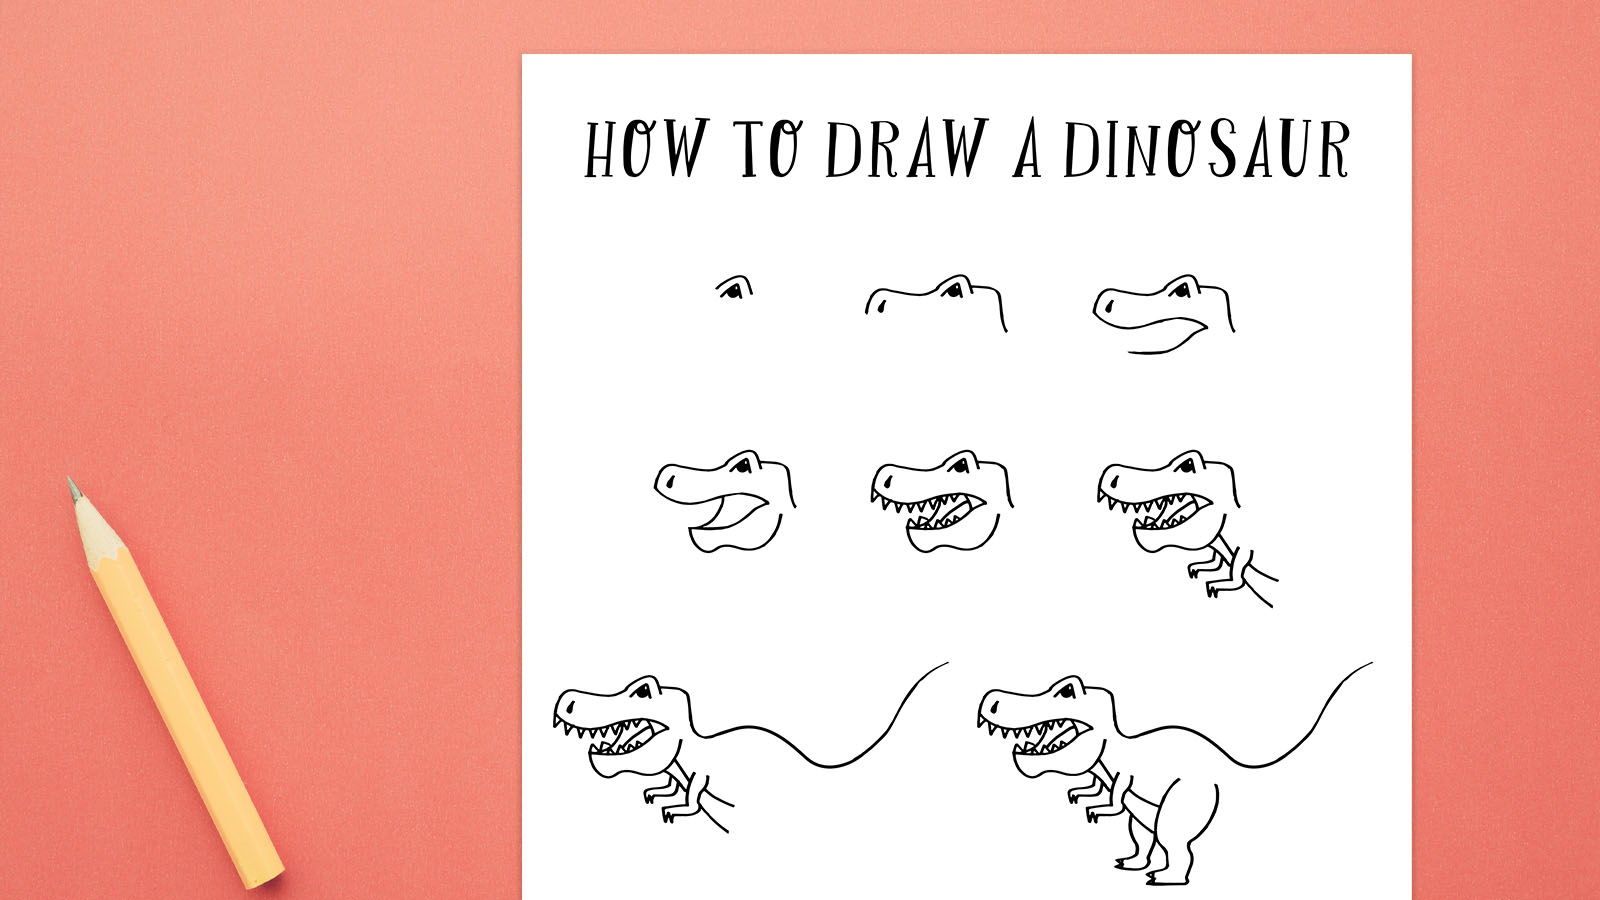
How To Draw a Dinosaur Step-by-Step
Here are 10 easy-to-follow steps for teaching kids how to draw a dinosaur. They should simplify the process for kids of all ages and abilities.
We Are Teachers
Step 1
Once you have your paper and permanent black marker ready, turn your paper horizontally and get ready to draw! You’ll want to begin by drawing your dinosaur’s eye a little left of center on the paper toward the top. Make an upside-down V shape and then make a smaller one inside. Shade all but a sliver of white, which will serve as the dinosaur’s pupil.
We Are Teachers
Step 2
We’re now going to begin to form the top of the dinosaur’s head. One longer line going left from the topmost V shape and curving down will form the dinosaur’s snout. Draw another shorter line from the right side of the topmost V shape. Then, bring that line down a little lower than the snout. Be sure to add a small nostril too!
We Are Teachers
Step 3
Let’s begin forming the mouth shape. Starting at the base of the snout, draw a horizontal S shape that comes to a point just a little further than the eye. Then, draw a line that curves down and out ending about halfway down the snout.
We Are Teachers
Step 4
This step will start where the last one ended. Draw a curving line that connects the bottom of the mouth upward just under where the eye begins. Next, draw the bottom of the dino’s head as a line with two curves that ends pointing upward.
We Are Teachers
Step 5
Now we’re going to add some details to the dinosaur’s mouth to help make him a bit more ferocious! Add a line in the inner corner of the mouth to form a small triangle. Add several triangles lining the top and bottom of the mouth so your dino can have some beautiful chompers. Finally, add a line from the small inner triangle to the middle portion of the bottom of the mouth.
We Are Teachers
Step 6
Let’s start drawing that body now! Begin by drawing a very narrow neck coming off of the bottom left side of the head. Draw one of those infamous tiny T-rex arms coming off the neck and then draw a slightly larger arm a little lower. The second arm is drawn larger so that the illusion of it being in the foreground is there. Begin to build the body out from there. It should line up with the sides of the neck but be slightly wider.
We Are Teachers
Step 7
It’s time to begin flushing out the rest of the dino’s body. Coming off the top left side of the head, draw a line that curves up and then down and then up again so that you form the dino’s back and beginning of the tail.
We Are Teachers
Step 8
The dino’s back leg in the foreground is going to start as a C shape that extends into the dino’s body and comes down to form a foot. The foot has two pointy toes attached to a short horizontal line that comes up and out into a C shape that mirrors the first one. The back leg in the background is smaller and the foot is higher than the other. It should start under the dino’s body in between the front arms and the larger back leg.
We Are Teachers
Step 9
Now we’re going to connect the tip of the tail to the bottom of the dino’s body. The bottom line should line up with the outer edge of the dino’s body in between the arms and legs. Another line should mirror that one just inside the other.
We Are Teachers
Step 10
While you can add the same detail inside the dino’s body that we’ve shown here, you can also feel free to personalize it a bit! If you want to re-create this dino, you can add upside-down triangles all along the top of the dino’s head, back, and tail. You can also add a few triangles along the leg in the foreground.
Get your free printable with step-by-step instructions for how to draw a dinosaur!
Are you ready to save and print your free dinosaur drawing printable? All you need to do is click the button below to fill out the form on this page.
Plus, check out more of our favorite Directed Drawing Activities for Kids.
For more articles like this, be sure to sign up for our free newsletters!